Understanding products lists
Purpose and scope
Do you want to sell different groups of products to different sets of customers? Perhaps you wish to create a coupon that is associated with a specific set of products and only available to a specific group of customers.
With our Product Lists feature, you can create product lists (from products and categories in your product catalogue) and link the product list with a group of customers. Only products on a product list associated with a customer is visible to that customer when they log into WebShop. We support four different types of product list: default, restricted, registration and coupon.
This feature guide describes and provides a step by step guide on how to use it.
Introducing terms and concepts used in this article
Term | Definition |
|---|---|
Customer | a client of the merchant. |
Product | an item for sale in the product catalogue. |
Product code (SKU) | the unique code for the product. |
Product list | a list of products that are grouped together and linked with a product list name. |
How it fits together
Imagine a scenario where you have a set of products that you only want to be visible to a specific set of customers.
A product list allows you to sort your products into different lists. Once segmented into lists, assign customers to different lists as you require. Customers can be assigned to multiple product lists. This feature allows you to manage which customers see which products, allowing you to create a more focused sales strategy.
Default product list
Used to define what products and/or categories can be purchased by specific customers who are logged into WebShop. Add specific products, categories and/or customers to a product list. When a customer on the default product list logs into WebShop, they can only purchase products that are on this list.
Restricted product list
Used to define which products and/or categories that can only be be purchased on WebShop by a specific set of customers. Assuming you do not have other product lists set up, the full product catalogue is visible to your customers. However, a defined set of products and/or categories can only be purchased by a specific set of customer(s) listed on a restricted product list
Registration product list
Used to restrict purchasing products to logged-in customers. Assuming you do not have other product lists set up, the full product catalogue is visible to all customers. All your customers can add products to their carts, but only those that are logged in can place an order. Should your customer attempt to checkout and place an order, they are presented with an option to sign up or log in.
Coupon product list
Used to set criteria under which a coupon applies. Assuming you do not have other product lists set up, the full product catalogue is visible to your customers. However, when your customer checkouts and they add the coupon to their order, it is only valid for the products and categories that are included in the coupon product list. The product list can also be restricted to a specific set of customers.
Key points
You can set one product list as the default product list. This sets the selected list as the set of products available to view and purchase for
all customers who are not logged into WebShop
all customers who are not on any other defined product list
A product list contains a list of products and a list of customers who are assigned to that list. One customer can have access to several lists. Once a customer is given access to some lists, they can see products only from those lists in WebShop.
Product lists work in conjunction with our Related Products feature; this means that if a product in a Related Product group is not on a customer’s product list, that related product is not displayed in WebShop.
More information
Assumption
You are logged into Management Interface.
View product lists
To view a list of all your product lists, click Customers, then select Product Lists on the left hand menu. This opens the Product Lists listing screen.
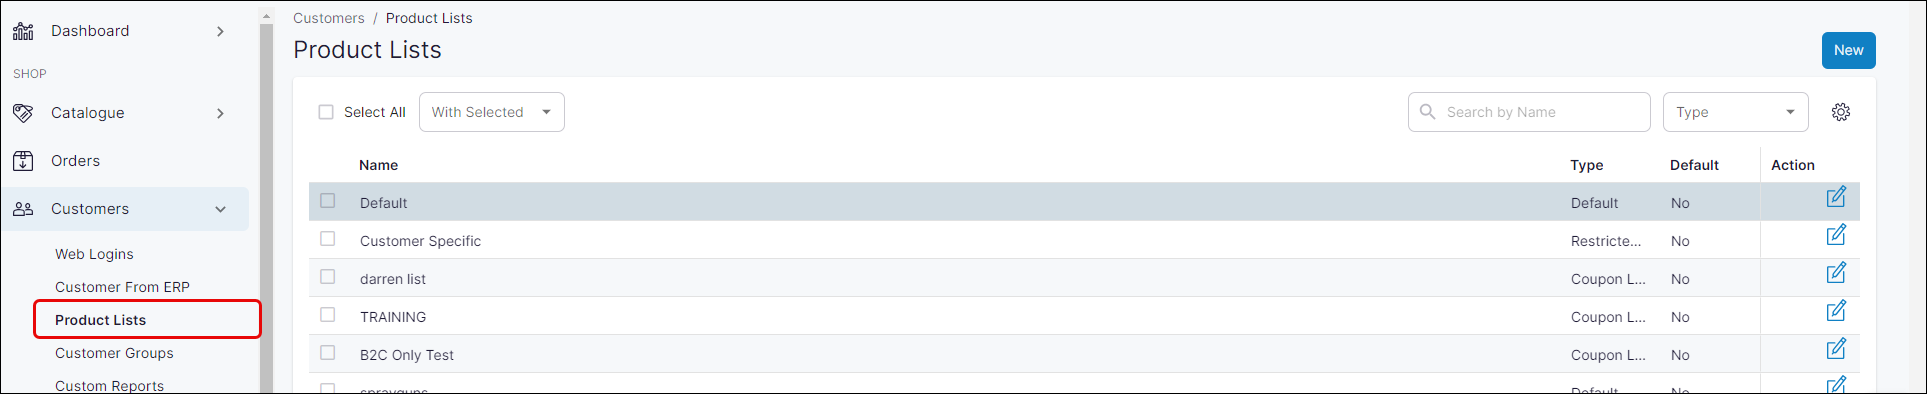
Read Screen Layout: Customers for more information about this screen.
Create a product list
Click Customers, then select Product Lists on the left hand menu. This opens the Product Lists listing screen.
Click New in the top right of the Product Lists listing screen. This opens a slider to the right of screen, as shown.
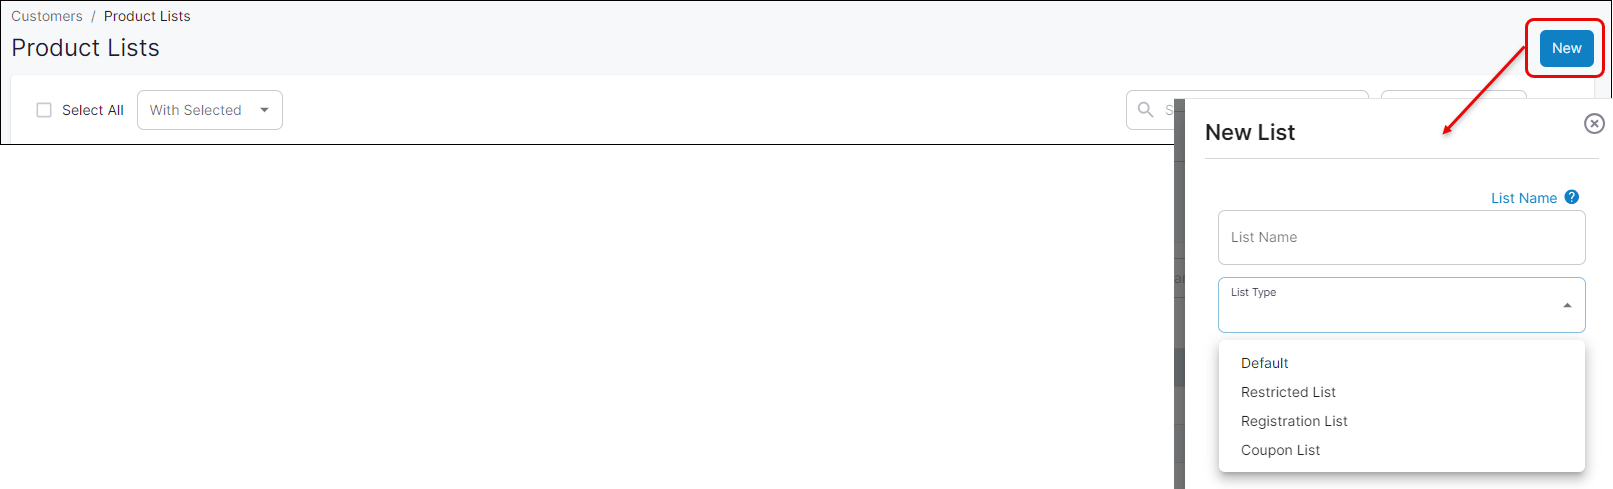
Enter the list name and select the list type from the drop-down box.
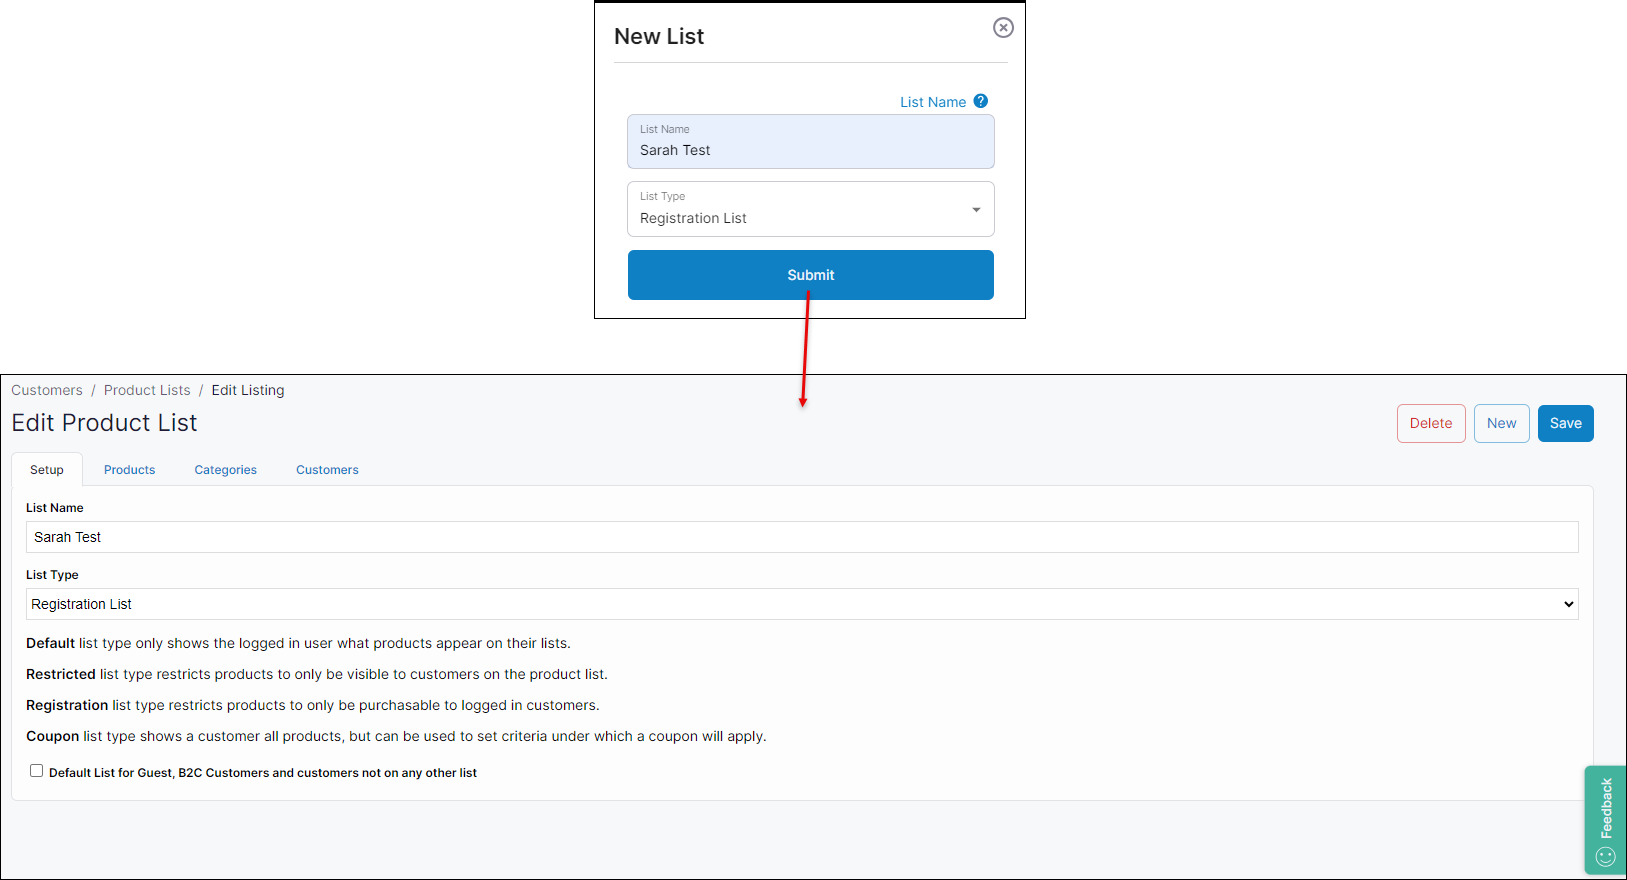
Click Submit to create the list. This creates an empty product list and opens the Edit Product List screen.
Enter details as required and click Save to save the product list.
Edit a product list
Click Customers, then select Product Lists on the left hand menu. This opens the Product Lists listing screen.
Open the Edit Product List by clicking on the Edit icon to the right of the product list you want to edit. This opens the Edit Product List screen. The Edit Product List screen has four tabs:
Setup
Products
Categories
Customers
Select the Setup tab.

Select checkbox to set a list as the default list.
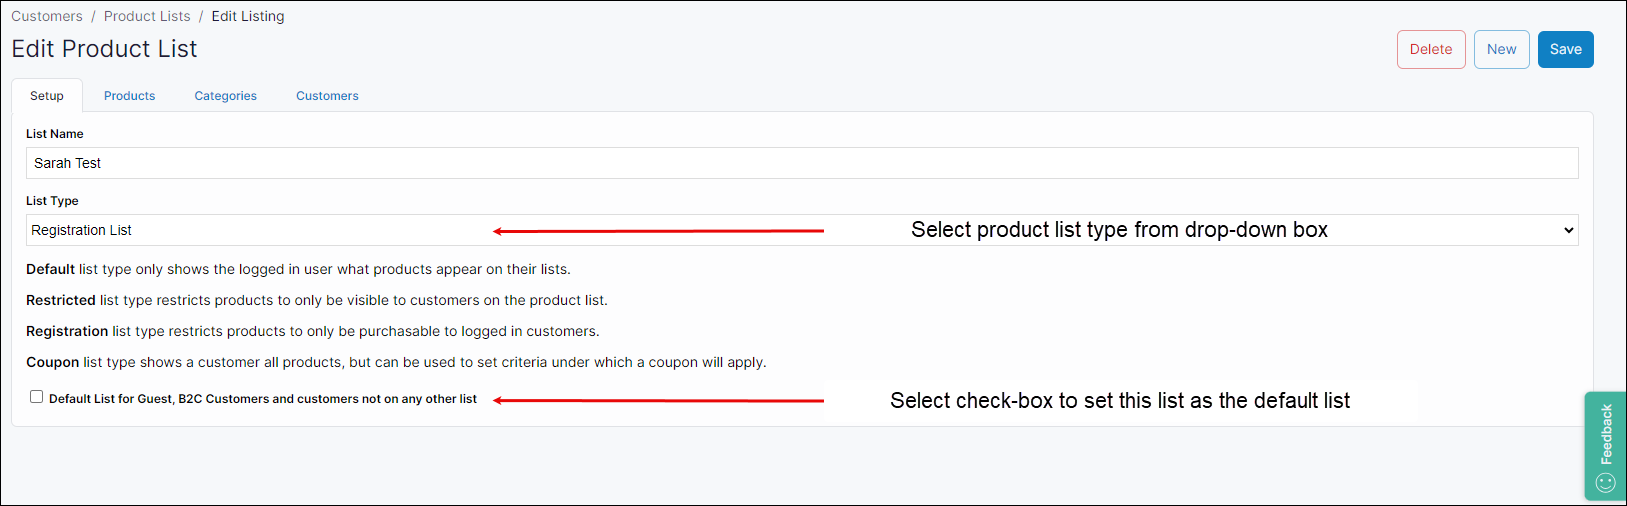
Click Save to save your changes.
While changes are applied immediately to your WebShop, you may have to clear your cache to see them.
Open the Edit Product List by clicking on the Edit icon to the right of the product list you want to edit. This opens the Edit Product List screen. The Edit Product List screen has four tabs:
Setup
Products
Categories
Customers
Select the Products tab.

Locate the product(s) you wish to add by entering a search term or product code / SKU in the text box under Products. This searches your product catalogue and displays a list of matching products.
Select the product you wish from the search results.
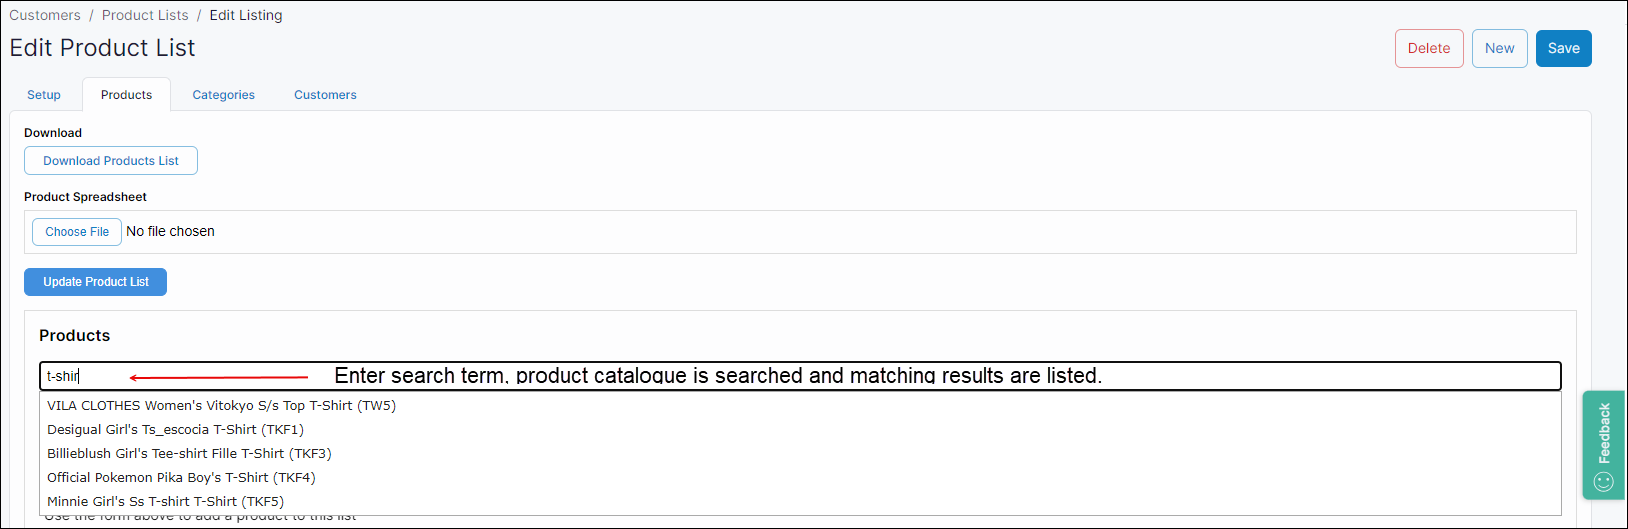
Click Add Product to List. This adds the product to the product list.
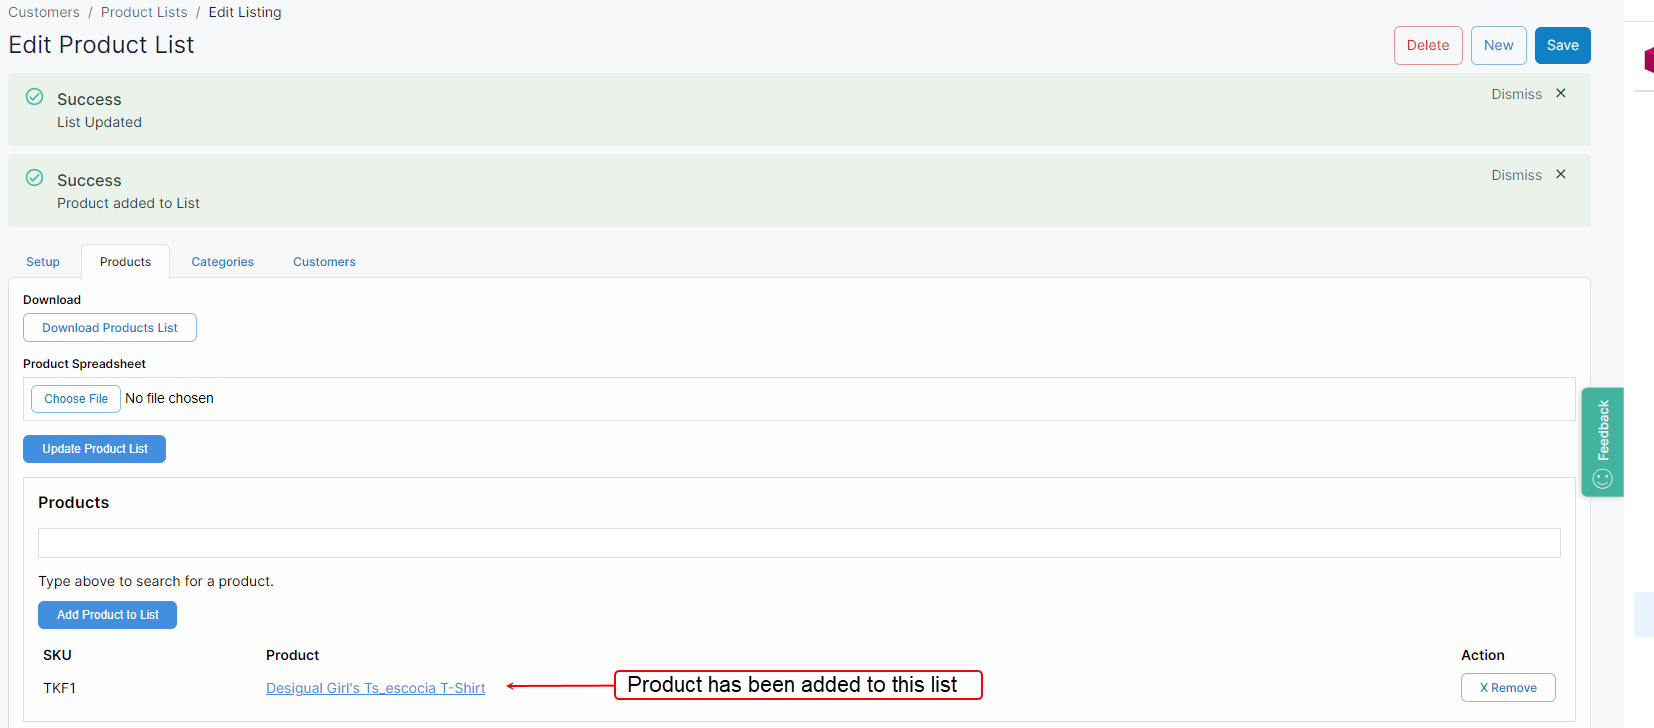
Changes are made immediately to your WebShop.
Open the Edit Product List by clicking on the Edit icon to the right of the product list you want to edit. This opens the Edit Product List screen. The Edit Product List screen has four tabs:
Setup
Products
Categories
Customers
Select the Categories tab.

Locate the categories(s) you wish to add by entering a search term in the text box under Categories. This searches your product catalogue and displays a list of matching categories.
Select the categories you wish from the search results.

Click Add Category to List. This adds the category to the product list.
Changes are made immediately to your WebShop.
Open the Edit Product List by clicking on the Edit icon to the right of the product list you want to edit. This opens the Edit Product List screen. The Edit Product List screen has four tabs:
Setup
Products
Categories
Customers
Select the Customers tab.

Locate the customer(s) you wish to add by entering the customer’s account code. This searches your customer list and displays a list of matching customers.
Select the customers you wish from the search results.
Click Add Customers to List. This adds the customers to the product list.
Changes are made immediately to your WebShop.
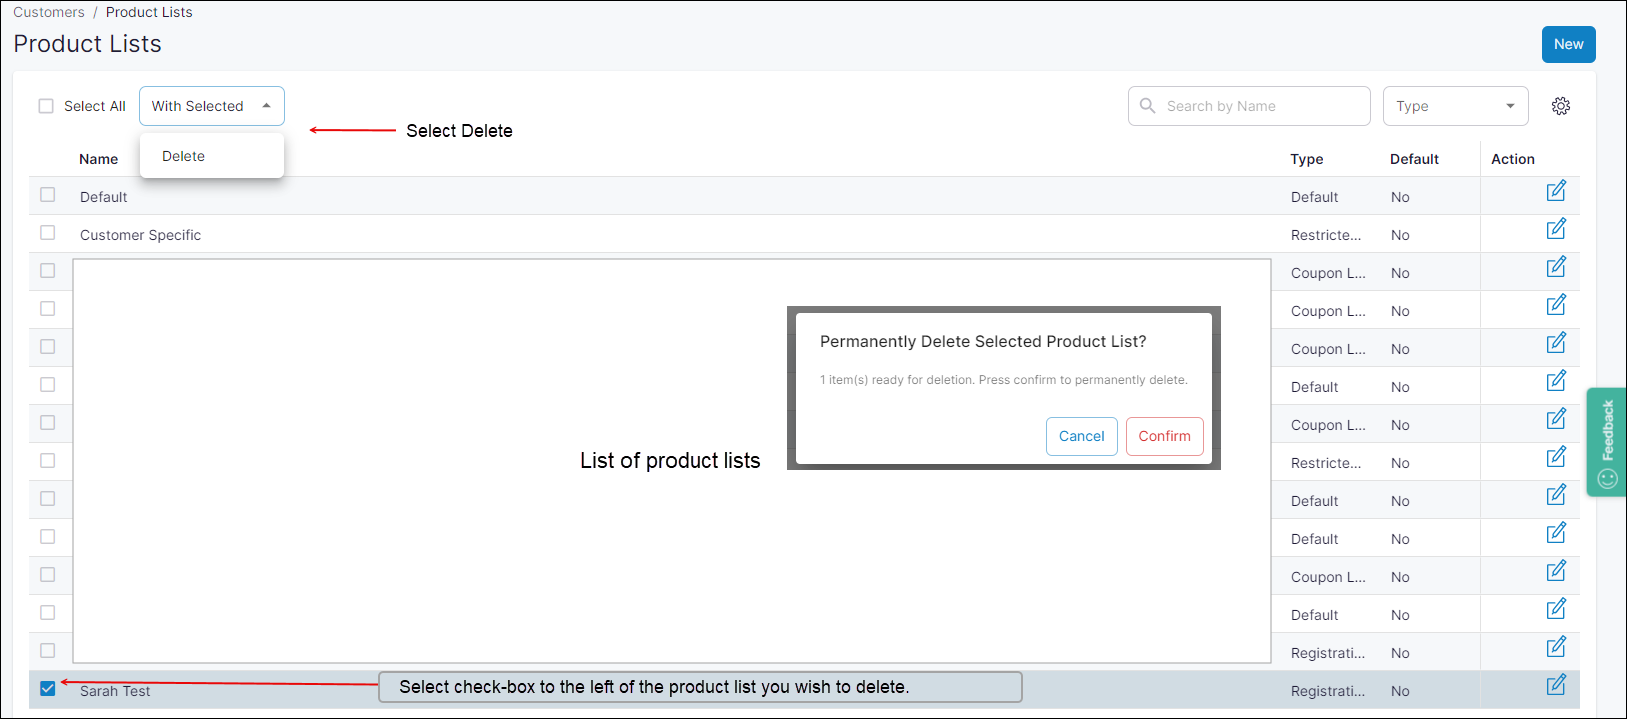
Click Customers, then select Product Lists on the left hand menu. This opens the Product List listing screen.
Click the checkbox to the left of the product list that you wish to delete. You may select one or more product lists.
Select Delete from the With Selected drop-down box. This opens a confirmation dialog.
Click Confirm to delete the list or Cancel to return to the Product List listing screen.
Notes
Changes are made immediately to your WebShop.
You can not remove a coupon product list if the list is associated with an existing coupon.

To remove a product, category or customer from an existing list, open the Edit Product List by clicking on the Edit icon to the right of the product list you want to edit. This opens the Edit Product List screen.
Select the appropriate tab, scroll down to the list of items (either product, category or customer) and click Remove to the right of the item you wish to remove from the product list.
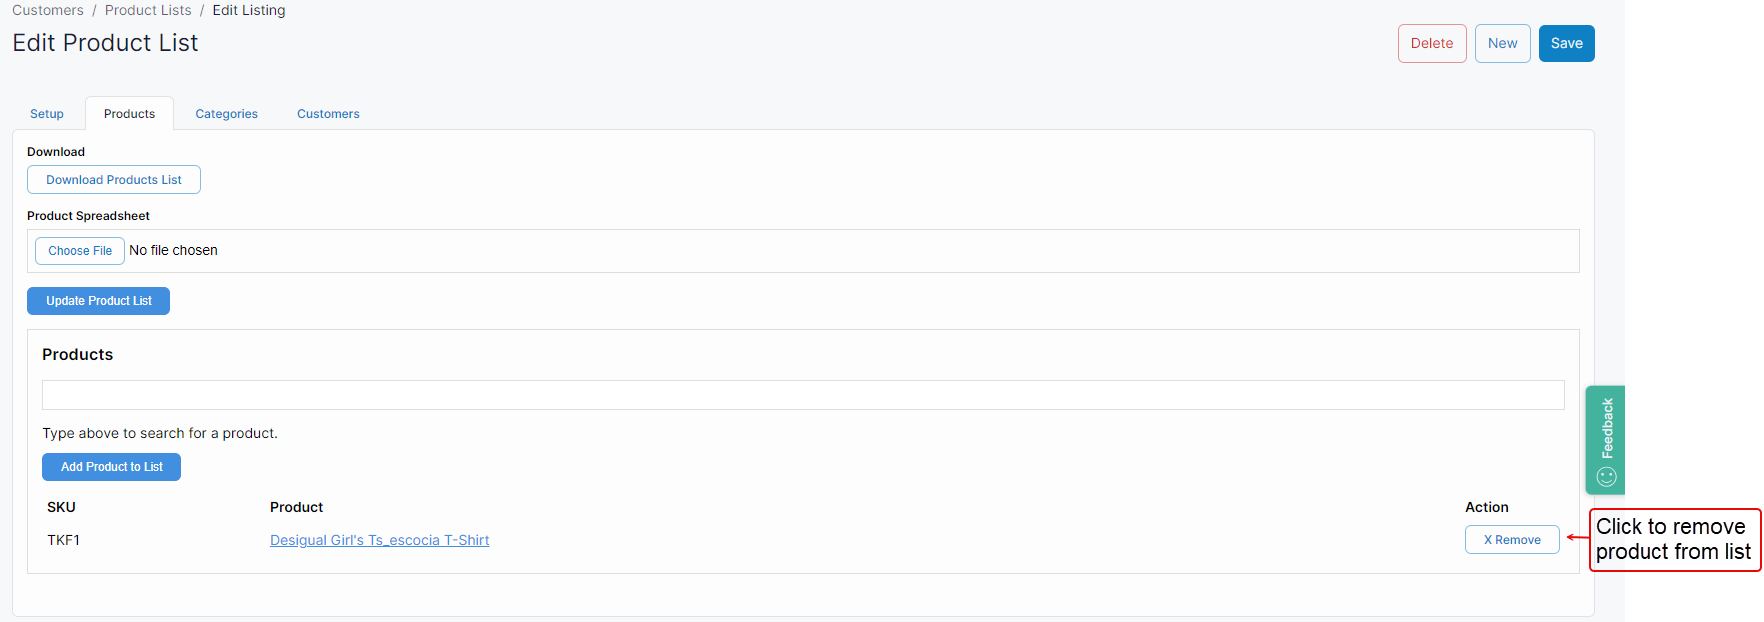
Remove product from product list
Changes are made immediately to your WebShop.
Import and export products on a product list
Click Customers, then select Product Lists on the left hand menu. This opens the Product List listing screen.
Open the product list you wish to export by clicking on the Edit icon to the right of the product list you want to edit. This opens the Edit Product List screen.
Click the Products tab.
Click Download Products List to export a list of products. This downloads the product codes associated with this product list into a spreadsheet.
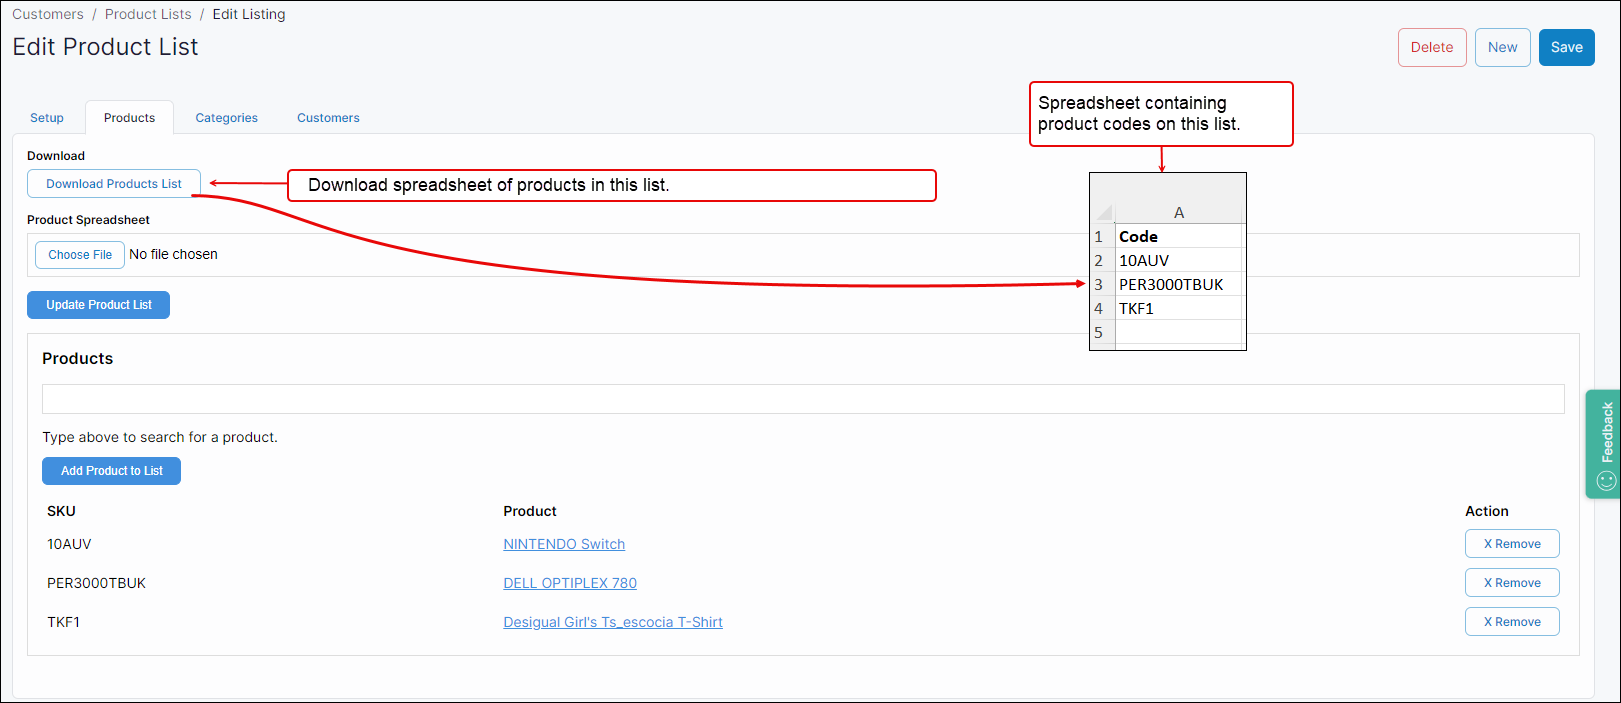
Edit the spreadsheet as required, by either adding or removing product codes.
Return to the product tab of the product list.
Click Choose File.
Locate the file in your directory and click Open.
Click Update Product List. This uploads the file, and adds or removes product codes from the product list as required.
Changes are made immediately to your WebShop.
Import customers on a product list
Click Customers, then select Product Lists on the left hand menu. This opens the Product List listing screen.
Open the product list you wish to export by clicking on the Edit icon to the right of the product list you want to edit. This opens the Edit Product List screen.
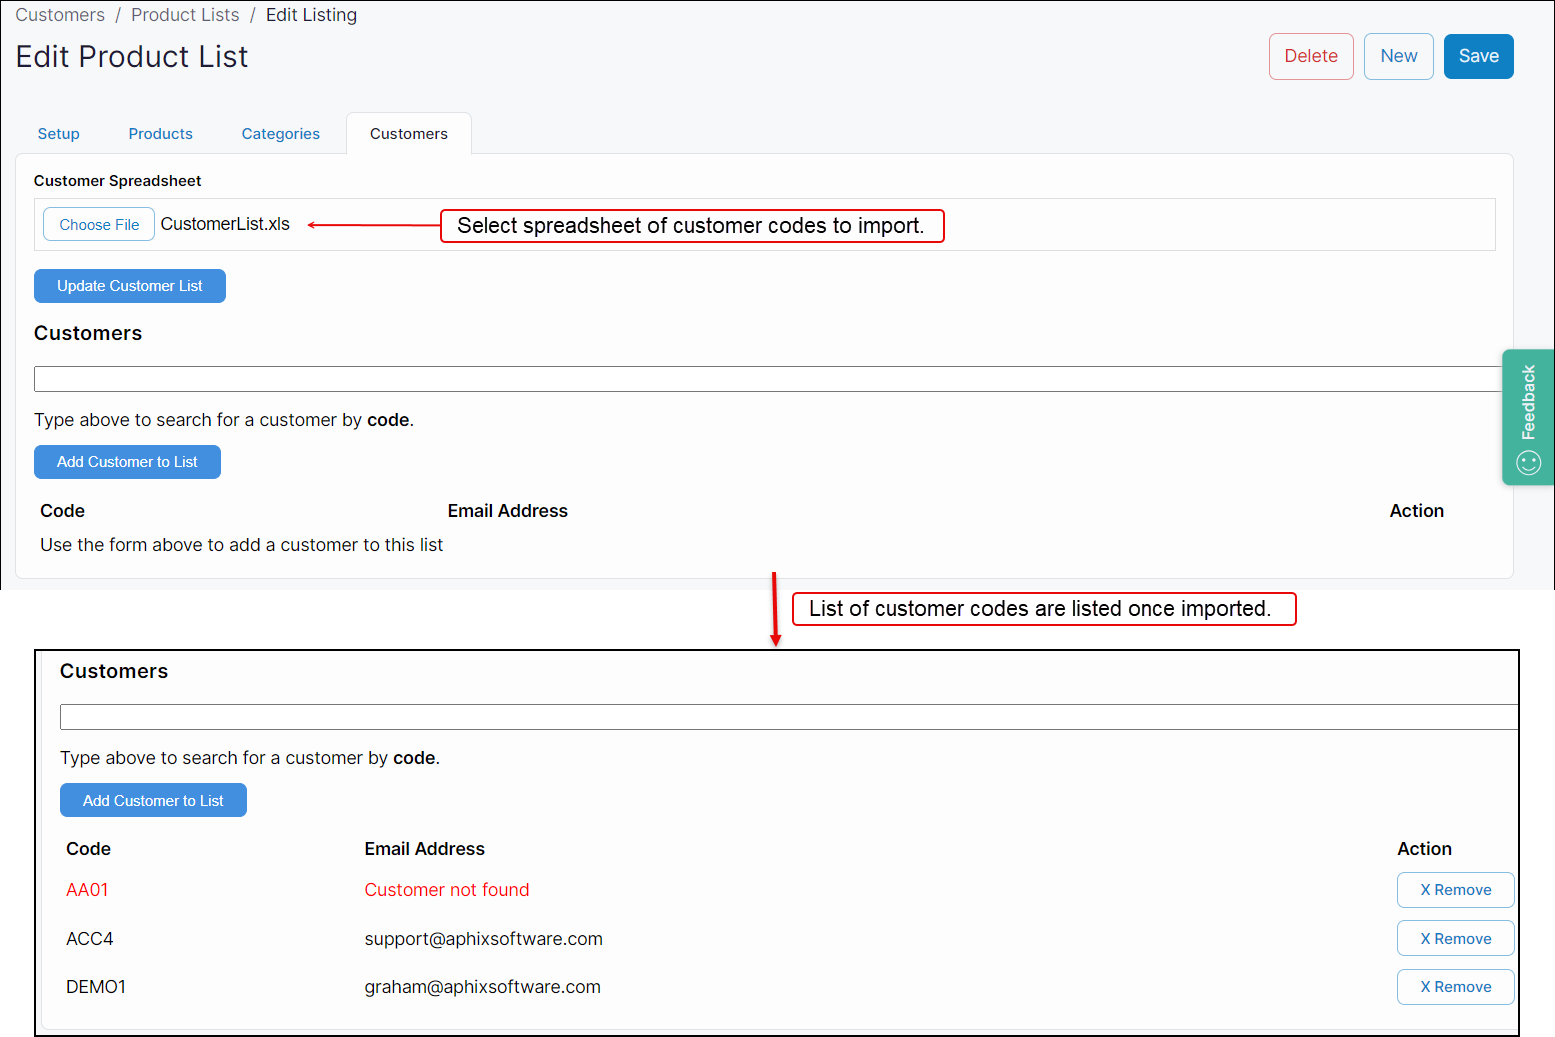
Click the Customers tab.
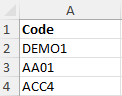
Create a spreadsheet of customer codes that you wish to import. The spreadsheet consists of one column with the heading of “Code“ in cell A1, and one or more customer codes underneath the heading, as shown.
Click Choose File.
Locate the file in your directory and click Open.
Click Update Customer List. This uploads the file and replaces from the product list as required.
Key points
Take care when modifying the spreadsheet as the customer list is replaced by what is included in the spreadsheet you upload.
An error is returned if you include a non-existent customer code.
Changes are made immediately to your WebShop.